|
|
|
| You are here:
Home /
/ Part 7: Packing & Shipping Specimens
|
 |
| Collecting and Preserving Insects and Mites: Tools and Techniques |

|
Part 7: Packing & Shipping Specimens
In mailing insects and mites, there is always a risk of damaging or losing specimens. By following the recommendations given here, the risk can be greatly reduced.
7.1 - Packing Materials
Cartons may be of strong corrugated board or other stiff material. Screw-top mailing tubes are good for small items. All containers must be large enough to include ample packing material to minimize the effects of jarring-a minimum of 5 cm on all sides (fig. 34). There are a wide variety of packing materials ranging from shaved wood and crumpled newspapers to foam or starch "peanuts". One of the best materials is the clear plastic sheet material with a regular pattern of bubbles (bubble wrap or blister pack). This is very light weight and has excellent shock-deadening properties.
7.2 - Pinned Specimens
Pinned specimens should always be placed as in a small box with a foam pinning bottom. The box should be well wrapped and placed in a larger carton with at least 5 cm of lightly packed packing material between it and the carton on all sides.
(1) Use a sturdy pinning box with a good pinning bottom at least 6 mm thick cemented securely to the bottom of the box. The box should have a tight lid or one held in place with a strip of masking tape. Do not mail specimens in an open-top museum tray.
(2) Pin the specimens firmly into the pinning bottom, leaving enough space for easy removal. Place bracing pins on each side of heavy or long-bodied specimens to prevent them from rotating (cartwheeling) on their pins and damaging adjacent specimens. Microvials should have an additional pin at the end of the vial to keep it from coming off its stopper. Vials other than microvials should be wrapped in a box separate from pinned specimens.
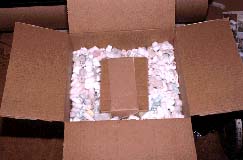
Figure 34. A box of specimens being readied for shipment. Note that ample room has been left on all sides of the specimen container for cushioning material.
(3) Unless the box in which the specimens are pinned is shallow enough so that the heads of the pins almost touch the lid, a piece of firm cardboard should be cut to fit into the box and lie on top of the pins. If there are only a few specimens in the box, a few extra pins should be added near the corners to keep the cardboard level. It is helpful to attach a tab made of a piece of adhesive tape folded double, with the ends left free to attach to the top of the inserted cardboard. The insert may be lifted out by the tab. The space between the insert and the lid of the box should be filled with enough packing material, preferably cotton batting, not excelsior or any shredded or loose material, to keep the insert pressed lightly against the tops of the pins when the lid is in place. This prevents the pins from working loose and wreaking havoc in transit.
(4) If only one or two specimens are being shipped, they may be placed in a straight-sided plastic vial with a press-on or screw-on top. The vial should be of sufficient diameter to hold the labels in a normal position. A cork stopper cut to such a length that its larger end is a little greater in diameter than that of the inside of the vial is pressed tightly into the bottom of the vial. This will provide a good pinning bottom into which one or two pinned specimens may be firmly pressed. Attach the cover of the vial, wrap the vial in enough packing material to hold it firmly in a mailing tube, attach the cover of the mailing tube, and it is ready to ship.
Although it is good practice to fumigate boxes before shipping, do not leave loose fumigant in the box with the specimens nor any fumigant balls on pins in containers. They are especially prone to work loose and damage specimens.
(5) Type specimens require special precautions. In most cases types should be packaged individually in small boxes and each box covered with a thin plastic wrap or something similar. In this way, if a specimen is damaged, the pieces are confined to a small area and there is no question of what pieces came from what specimen.
7.3 - Specimens in Vials
The following procedures are recommended for shipping vials:
(1) Fill each vial with liquid preservative. Stopper tightly by holding a pin or piece of wire between the vial and the stopper to permit air or excess fluid to escape, then remove the pin or wire. Make certain that cork stoppers do not have defects that will allow leakage. Screw-top vials should be firmly closed and sealed with a turn and a half of plastic adhesive tape or Parafilm around the lower edge of the cap and part of the vial. There is no need to seal with paraffin; it often breaks loose and will not prevent leakage.
(2) Wrap each vial with cotton, tissue, paper toweling, or similar material. Allow no piece of glass to come into contact with another piece of glass. Several vials may be wrapped together or held with tape or rubberbands as a unit, or they may be placed in a small cardboard box with enough packing to insure that they are not shaken around.
7.4 - Loading Cartons
After pinned specimens, specimens in vials, or both have been prepared properly, they should be placed in a strong carton large enough to hold at least 5 cm of packing material around all sides including the top and bottom (fig. 34). Use enough packing material to prevent the contents of the carton from moving about, but do not pack the material tightly. It should be resilient enough to absorb shocks and prevent damage to the contents being shipped. One or a few vials may be shipped in a mailing tube as previously described. When shipping more than one box or packet of vials, tie or wrap them together as a unit before placing them in the larger carton. Individual boxes or vials otherwise may easily be overlooked and lost when unpacked. Since vials of specimens in fluid are much heavier than boxes of pinned specimens, cartons containing many vials may be packed somewhat tighter in the carton than those containing only pinned specimens since they tend to remain relatively stationary in the carton. It is not necessary to ship pinned and liquid-preserved specimens in separate cartons, but if there are many of the latter, it is advisable to ship them separately.
7.5 - Shipping Microscope Slides
First of all, make certain that any slide shipped is thoroughly dried and cured. Many slides may appear to be cured when in fact the center is still liquid. Coverslips on slides which are not cured may move during shipment and damage or destroy the specimens. Slides may be shipped in holders made expressly for that purpose and available commercially from biological supply houses (fig. 35). Even in these holders it is advisable to wrap a little soft tissue around each end of each slide so that the cover glass does not come into contact with anything. The slides may also be shipped in standard storage boxes with enough soft tissue around each end of each slide and between the slides and the box lid to prevent movement. The box should then be wrapped to hold the lid down firmly. It may then be treated as described here for pinned and liquidpreserved specimens. The wrapped slide container may also be tied together with units of pinned or liquidpreserved specimens or both and placed in a carton with them. If no slide holders are available, a few slides, each wrapped with tissue, may be tied together at each end with tape, rubberbands, or string, wrapped in strong paper, and placed in a mailing tube or carton with packing material.
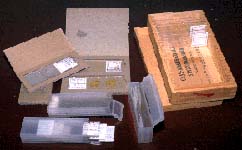
Figure 35. Some commonly used containers for shipping microscope slides
7.6 - Shipping Live Specimens
Most insects and mites intended for a collection or submitted to experts for identification should not be shipped alive. To protect American agriculture, Federal law prohibits the importation and movement of live pests, pathogens, vectors, and articles that might harbor these organisms unless the shipments are authorized by the U.S. Department of Agriculture. If it is necessary to ship live material, be sure to comply with all Federal, State, and local regulations. Shipments of live insect material without valid permits may be seized and destroyed by plant quarantine inspectors. In addition to meeting Federal laws, the shipment of some species must be approved by State officials. For most questions regarding most federal regulations, contact the Animal and Plant Health Inspections Service (APHIS) within the U.S. Department of Agriculture.
Pupae or larvae shipped to be reared elsewhere should be placed in tightly closed containers without vent holes. These insects require a minimum of air and will not suffocate. Pupae preferably should be packed loosely in moist (not wet) moss or similar material. Larvae should be packed with enough food material to last until their arrival. Most beetle larvae and some caterpillars, especially cutworms, should be isolated, since they are rather cannibalistic. To prevent excessive accumulation of frass (fecal material) and moisture, do not overload containers. Plant material held without ventilation tends to become moldy, especially when kept in plastic bags. For this reason, pieces of the host plant bearing such insects as scale insects (Coccoidea) should be partially or completely dried before being placed in a container, or they should be packed in a container such as a paper bag, which will permit drying to continue after closure. Live Heteroptera and other small, active insects are killed easily by excessive moisture in the container. Therefore, it is advisable to provide several tiny vent holes or place a fine mesh screen over one end of the container when shipping such insects.
Some containers designed to hold living insects are strong enough to be shipped without additional packing, but generally the containers should be enclosed in a second carton with enough packing material to prevent damage to the inner carton. In all cases, affix a permit for shipping live insects in a conspicuous place on the outside of the shipping container.
In recent months, regulations concerning the shipment of dead specimens has changed markedly. This is largely in response to concerns about trade in rare or endangered species and "wildlife". Previously, most insects were excluded from the category of "wildlife", but recent rules have been expanded to include insects in this definition. Within the U.S. it is still possible to ship dead insect without special permits. However, shipment of dead insects to foreign countries (or importation of specimens from foreign sources) may now require the filing of U.S. Fish and Wildlife Service Form 3-177. It is adviseable to check with Fish and Wildlife Service officials at the nearest port of entry (usually either a major airport or sea port) to find out what they require as there can be variation from port to port.
It is recommended that all packages be marked "FRAGILE" and that a complete return address be included on the outside of each container. Valuable specimens such as types should be sent registered mail. While this is more expensive than regular parcel post, it allows misdirected packages to be tracked much more readily. It is also advisable to place a label such as "Dead Insects for Scientific Study. No Commercial Value" on the outside of the package.
|
|
|
|
|
|
|


