Specimens are mounted so that they may be handled and examined with the greatest convenience and with the least possible damage. Well-mounted specimens enhance the value of a collection; their value for research may depend to a great extent on how well they are prepared. Standardized methods have evolved over about 2 centuries in response both to the aesthetic sense of collectors and to the need for high quality research material. Although the style and technique of mounting may vary from one worker to another, the basic procedures outlined here are widely accepted. Methods of preparation are subject to improvement, but in the interest of uniformity it is best to follow currently accepted practices until the superiority of other methods has been proved.
The utility of a mounted specimen-that is, how well it is preserved, how safe it is from damage, and how much of the specimen can be examined conveniently- is generally of more importance than its beauty. Research considerations should take second priority only with specimens mounted specifically for nontechnical display purposes.
Preparation of specimens for a permanent collection is discussed here except specimens to be kept permanently in a liquid preservative or in papers or envelopes (see Temporary Storage of Specimens). Specimens to be prepared for a permanent collection may be fresh, that is, their body tissues not yet hardened or dried; or they may have been in temporary storage and must be specially treated before mounting. Dry specimens usually must be relaxed, and those preserved in liquid must be processed so that they will dry with minimal distortion or other damage.
Equipment typically needed to mount specimens includes forceps, a pinning block, pins, paper points, scissor, glue, and specimen holder (fig. 18).
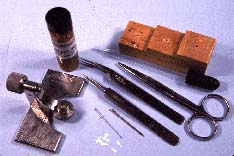 Figure 18. Commonly used specimen mounting tools include a pinning block, forceps, pins, points, glue, and scissors
3.1 - Preparing Dry Specimens for Mounting
Any dry insect that is to be pinned must be relaxed, that is, remoistened enough to soften so that it will not break when the pin is inserted or so that parts of the specimen may be rearranged or repositioned. Insects, especially Lepidoptera, that are to have their wings spread should be relaxed even if they have been killed for only a short time. The muscles of Lepidoptera, once the stiffening of rigor mortis sets in, which occurs in a matter of minutes, are strong enough so that adjustment of the wings is difficult, but treatment in a relaxing chamber usually will make this procedure much easier. Eight hours in a relaxing chamber should suffice, but larger specimens may require 24 hours or more. Simply leaving specimens in a cyanide jar for awhile sometimes will relax them, but this method is not reliable.
Reference: Lane 1965.
High humidity must be provided in a relaxing chamber for periods varying from several hours up to about 3 days, depending on the circumstances, without the specimens actually becoming wet. The growth of mold is also to be avoided, since it will ruin specimens left too long in relaxing chambers unless a chemical mold inhibitor has been added. Insects killed with cyanide usually can be relaxed easily, but some killing agents, especially chloroform, ether, and carbon tetrachloride, may harden muscles to such an extent that the specimens are brittle and seemingly impervious to the humidity of the relaxing chamber. In Korea, for example, butterflies are injected in the thoracic muscles with very hot water through a fine hypodermic needle before spreading. Occasionally, however, some specimens can not be relaxed satisfactorily by any method.
Many kinds of receptacles can be used as relaxing chambers, including glass dishes or jars with covers (low, widemouthed jars or casserole dishes are excellent), tobacco or biscuit tins, even earthenware crocks. Glass or earthenware containers are not so immediately affected by fluctuations in temperature as are other types and thus may relax insects more evenly. Containers 5-15 cm deep are most convenient; clear plastic sandwich boxes not more that 2.5 cm deep will serve for small specimens if they are not on pins. A layer of damp sand, peat, or crumpled paper toweling is placed in the bottom of the container and covered with a layer of cotton, cellulose wadding, or jeweler's cotton. This layer will not absorb water readily and will prevent direct contact between the insects and the moisture beneath.
Some workers object to the use of cotton because of the tendency for insect legs to become entangled in it and break off. If this is a problem, cover the cotton with a single piece of soft tissue. For very small specimens, a lining of tissue or some absorbent material with a smooth surface is advantageous. Heavy paper such as blotting paper or cardboard may be used in place of cotton, but this should be supported 1 cm or more above the moist bottom layer to avoid direct contact. Wooden or plastic strips or fine-mesh plastic screen also may be used for this purpose.
Mold probably will not be a problem if insects are relaxed for no longer than 2 days at normal room temperature, but relaxing chambers in regular use should be kept clean, with frequent renewal of the contents. If mold is likely to develop, as may happen with large specimens held more that 2 days, a few crystals of naphthalene, paradichlorobenzene, phenol, or chlorocresol may be sprinkled in the bottom of the relaxing chamber, or a little thymol, which is more potent, may be used. Al1 these chemicals, however, may damage plastic boxes.
Insects held too long in a killing jar, or those that were originally papered, pinned but unspread, or layered (that is, placed in small boxes between pieces of soft tissue) may be relaxed by placing them in a relaxing chamber. Papered specimens will relax faster if removed from their envelopes. For beetles and other insects that do not need to have the wings spread, holding them overnight or at most for 24 hours in a relaxing chamber will suffice. Small moths and delicate Neuroptera also should be relaxed sufficiently after 12-24 hours to allow the wings to be spread. Large moths, however, may take 48 hours or longer if the relaxing chamber is kept at room temperature. The process can be hastened and the chance of mold developing greatly reduced if the relaxing jar is subjected to a slight raising and lowering of temperature, as perhaps between 18° and 27° C. The process is greatly accelerated if the relaxing jar is set in, or floated on, warm water for an hour or more; specimens may be relaxed within 3-6 hours in this way. If the warm-water treatment is overdone, the specimens may be spoiled by the absorption of too much moisture. Some colors, especially nonmetallic greens in Lepidoptera, are unstable and may be completely bleached by exposure to too much humidity. Such material requires special attention; the specimens should be left in the relaxing chamber for the shortest possible time and ideally should be pinned and spread when fresh. Experience soon enables one to judge the best procedure for the particular kind of material being prepared.
The length of time that insects may be left safely in a relaxing chamber depends somewhat on the temperature. At 18°-24° C, they may be left for about 3 days, but beyond that time, they will begin to decompose. If the relaxing chamber is placed in a refrigerator at 3°-4°, the specimens may be kept for 2 weeks, although they may be slightly damaged from excessive condensation by that time. If relaxing chambers containing fresh specimens are placed in a deep freeze at -18° or lower, the specimens will remain in comparatively fresh condition for months, but not indefinitely. Specimens gradually desiccate and eventually will become dried. However, a freezer may be used to keep them fresh for a month or two and is a great convenience.
Even when specimens have been relaxed suitably for spreading, the wings may still seem stiff. In this instance, the wing muscles must be loosened by forcing the wings to move up and down. This may be safely done by pressing the tips of curved forceps firmly against the costal vein very near the base of the wing. The forceps should have the tips ground or honed smooth and not too sharp. Repeat this procedure separately with all four wings or they will revert gradually toward their original positions. With care, all the wings may be loosened in this way without leaving any visible marks.
Occasionally it may be desirable to relax and reposition only a part of an insect as, for example, moving a leg that may be concealing characters needed for identification. This may be accomplished by putting a drop or two of Barber's fluid (see Appendix) or ordinary household ammonia directly on the leg. Most household ammonia is now furnished with a detergent, which helps it wet and penetrate insect tissue. After a few moments, perhaps after adding a little more fluid, the part may be pried carefully with a pin. When it moves easily, it may be placed in the desired position, held there with a pin fixed in the same substrate as is holding the pin on which the specimen is mounted, and left until the fluid dries thoroughly.
A few methods of relaxing insects with heat have been used. These and others are summarized in the following reference, in which a steam-bath method is described.
Reference: Weaver & White 1980.
3.2 - Preparing Liquid-Preserved Specimens
Most specimens preserved in fluid must be removed from the liquid in which they have been stored so that they will dry with as little distortion or matting of hairs as possible. Specimens which have been in fluid for some time should generally be washed with clean solution before drying. Only specimens with hard exoskeletons, such as beetles and some bugs (Pentatomidae, Cydnidae), may be mounted without special treatment when removed directly from the preserving fluid onto pins or points. The following methods have been used routinely for removing specimens from the usual fluid preservatives, and the specimens are often left in better condition than if they had been pinned while fresh, especially small Diptera.
The following equipment is needed: (1) A few screw-top jars about 5 cm in diameter with a cork cemented with epoxy on the top of each lid and a label on the outside showing clearly what they contain -- some about one-third full of Cellosolve (2-ethoxyethanol, ethylene glycol ethyl ether) and some about one-third full of xylene; (2) a small dish, such as a watchglass; (3) absorbent tissue from which to twist small "pencils" for absorbing xylene; (4) insect pins or double mounts (see p. 29)for mounting the specimens; (5) adhesive in a jar with a rod in its stopper; (6) narrow-pointed forceps; and (7) a few small cards of blotting paper.
When specimens are ready for preparation, remove as many from the preservative as can be pinned or placed on triangles or card points in an hour (experience will tell). Place them on blotting paper, then drop them from the blotter into a jar of Cellosolve, and place a label with the collection data on the pin stuck into the cork cemented to the lid of the jar. This may be done at the end of the day and the specimens left in the Cellosolve overnight, or otherwise for about 3 hours, longer for large specimens. They may even be left over a weekend. The same jar of Cellosolve may be used several times, up to about 10 times if the insects are small. This part of the treatment removes water and other substances from the specimens. However, Cellosolve does not evaporate readily, so it must be removed subsequently with another solvent, which will evaporate readily.
The next step is to use forceps to remove the specimens carefully from the Cellosolve, place them again briefly on blotting paper, then into a jar containing xylene. The identifying label on the pin in the cork must also be transferred. Small specimens should be left in the xylene for about 1 hour, larger specimens for up to 4 hours. Specimens left too long in xylene will become extremely brittle and can hardly be put on a pin or triangle without losing legs, antennae, or the head. As with the Cellosolve, the xylene also may be used many times until it becomes so contaminated with Cellosolve that specimens dry slowly when removed from it. While specimens are still wet with Cellosolve or xylene, they are somewhat pliable, and legs and antennae may be repositioned slightly.
When specimens have been in the xylene for at least 1 hour, they may be mounted. Take the smallest ones first to avoid leaving them in the xylene too long. Remove them with small forceps and place them in a dish. The forceps will pick up a small amount of xylene, and the specimen will be left lying in it. While there, it may be positioned correctly for mounting; the wings will float out flat, sometimes with a little adjustment with a pin or the tip of the forceps. When it is positioned correctly, take a "pencil" of absorbent tissue and touch it to the specimen to remove the excess xylene. Larger specimens may be pinned directly in the usual manner (see p. 28). Just before the xylene fully dries from the surface of a small specimen, the tip of a triangle or a tiny pin called a minuten, already attached to its carrying insect pin, should be touched to adhesive (see Double Mounts, p. 29). The tip of the triangle may then be touched to the specimen, picking it up. If a minuten is used, it may be inserted into the thorax of the specimen. A little final adjustment of position may then be made, and the specimen is ready for its label and place in the collection. If the specimen has been placed on a minuten, having touched the tip of the minuten to the adhesive will leave a small amount of adhesive around the place where the minuten has pierced the specimen and will keep it from working loose when fully dried.
Specimens placed on regular pins should have a small amount of adhesive placed around the site where the pin protrudes from the lower side of the specimen. Specimens pinned after having been in fluid preservatives do not cling as firmly to the pin as do those pinned fresh.
This treatment will leave surface pile, hairs, and bristles in a loose, unmatted, natural condition. Small specimens that shrivel considerably after having been pinned fresh will usually dry in better condition if pinned or placed on triangles after this treatment.
Warning: Xylene is now considered to be carcinogenic. A new and already widely used chemical, Histo-Clear, is a promising substitute.
Reference: Sabrosky 1966.
3.3 - Direct Pinning
This section pertains entirely to insects because mites should never be mounted on pins. Direct pinning refers to the insertion of a standard insect pin directly through the body of an insect. Only insect pins should be used; ordinary straight pins are too short and thick and also have other disadvantages. Standard insect pins are 38 mm long and range in thickness from size 000 to 6 or 7. Heads are now commonly made of nylon, but they may be of a type called "upset," that is, an integral head is made by mechanically squeezing out the end of the pin, or a small piece of metal is pressed onto the pin. A well-made upset head is considered by some entomologists to be best; other kinds of heads sometimes come off, leaving a sharp point that easily can pierce a finger. Recently, however, pins have become available with nylon heads attached rather firmly. Pins of No. 2 diameter are most useful (0.46 mm in diameter). Most entomologists avoid the very slender pins of size 000 to 1, preferring to use double mounts (see p. 28), but now that soft polyethylene or plastic foam is commonly used for pinning bottoms in trays and boxes, these smaller sizes are not so impractical as formerly. Pins of larger diameter, Nos. 3-7, may be needed for large insects.
Standard insect pins are currently made of either ordinary spring steel, which is called 'black,' or stainless steel and with either a blued or a lacquered (japanned) finish. The black pins may corrode or rust with even slight exposure to moisture or to the body contents of the insects. Although the stainless steel pins are more expensive than black pins, their being rustproof makes them desirable for use in permanent collections. However, their points are somewhat more easily turned than those of black pins in piercing an insect with a hard cuticle, and they are not as rigid. For that reason, it is sometimes advisable to pierce an insect having an especially hard cuticle with a strong steel pin before inserting a stainless steel pin. Lacquered pins have a surface on which the insect may be less likely to become loose than it might on a bare pin.
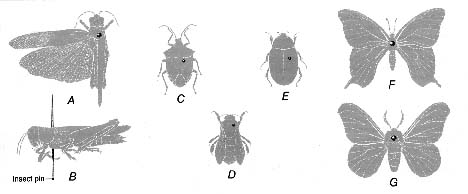
Figure 19. Diagram showing proper pin placement for mounting various types of insects A & B) grasshopper, C)true bug, D) bee, E) beetle, F) butterfly, G) moth
Insect pins made of German silver or brass were once common. They quickly corroded from the action of the insect body contents, producing a greenish verdigris about the pin in the insect and eventually eating entirely through the pin.
One who handles a large number of pinned specimens may find pinning or dental forceps helpful. Their curved tips permit the pin to be grasped below the data labels and enable one to set the pin firmly into the pinningbottom material without bending the pin. The forceps are also of much assistance in removing pins tightly corroded into the cork pinning bottoms. The pin is grasped tightly above the cork and turned a little before it is lifted. However, with wings of most Lepidoptera, it is impractical to place pinning forceps below the specimen.
Insects should be pinned vertically through the body with a pin of appropriate thickness, using care that the pin does not tear off any legs as it goes through the body. Most insects are pinned to the right of the midline so that all the characters of at least one side will be visible. Figure 20 illustrates some right and wrong examples of pinning. Do not attempt to pin specimens unless they are relaxed (see p. 25) or freshly killed. Inserting a pin into a dry specimen may cause it to shatter. When pinning relaxed specimens or specimens taken from Cellosolve and xylene, a little glue may be . needed where the pin emerges from the specimen to prevent the specimen when dry from working loose and rotating on the pin. Application of adhesive is unnecessary when mounting freshly killed insects.
Standard methods of pinning some of the commoner types of insects are as follows:
(1) Orthoptera-Pin through back of thorax to right of midline (fig. 19, A-B). For display purposes, one pair of wings may be spread as shown, but many orthopterists prefer to leave wings folded because of limited space in most large collections (see Beatty & Beatty 1963).
(2) Large Heteroptera-Pin through triangular scutellum to right of midline (fig. 19, C). Do not spread wings. In Reduviidae, Coreidae, and other slender forms, pin through back of prothorax to right of midline.
(3) Large Hymenoptera and Diptera-Pin through thorax between or a little behind base of forewings and to right of midline (fig. 19, D). So that no characters on body are obscured, legs should be pushed down and away from thorax, and wings turned upward or sidewise from body. Wings of most Diptera will flip upward if specimen is laid on its back before pinning and pressure is applied simultaneously to base of each wing with pair of blunt forceps. Wings should be straightened if possible so venation is clearly visible. Folded or crumpled wings sometimes can be straightened by gentle brushing with a camel's hair brush dipped in 70 percent alcohol. For Hymenoptera wings, Peterson's XA mixture (xylene and ethanol, equal parts by volume) is recommended.
(4) Large Coleoptera-Pin through right wing cover near base such that the pin exits through the metathorax (between the middle and hind legs) (fig. 19, E). Do not spread wings.
(5) Large Lepidoptera and Odonata-Pin through middle of thorax at thickest point (fig. 19, F) or just behind base of forewings (fig. 19, G). Spread wings as described on page 32.
The height of the insect on the pin will depend somewhat on its size, but enough of the pin should always be exposed above it to be grasped without the fingers touching and possibly damaging the specimen. Those mounted too high on a pin very likely will be damaged in handling. If pinned too low, the legs may be broken when the pin is inserted in a tray or box and insufficient space may be left for labels.
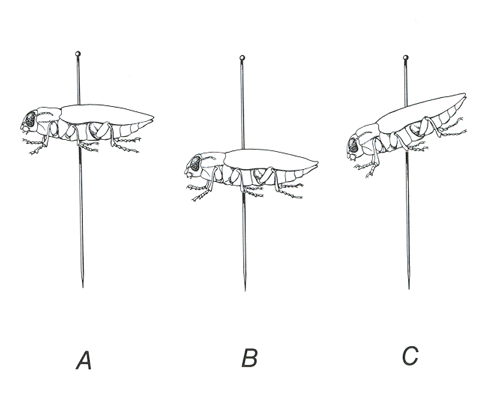
Figure 20. Proper specimen placement on the pin. A) Correct height and postion. B) Specimen too low on pin. C) Specimen improperly tilted on pin.
After the pin is inserted and before the specimen is dry, the legs, wings, and antennae should be arranged so that all parts are visible for study. With most insects, it is necessary only to arrange the legs and antennae in the desired position and let them dry, but occasionally it is necessary to hold the appendages in place with insect pins until the specimen is dry. With long-legged species or those with drooping abdomens, the legs and abdomens may be supported until dry with a piece of stiff paper pushed up on the pin from beneath. Once the specimens are dry, this paper support can be removed. For moths, butterflies, and other insects that should be mounted with the wings spread, use a spreading board (see p. 30) or spreading block (see p. 30).
Although some entomologists glue small insects directly to the side of a standard insect pin, this practice is not recommended because too much of the insect is often obscured either by the glue or by the pin, and the adhesive does not adhere well to the pin. For small insects, use a double mount.
3.4 - Double Mounts
Insects that are too small to be pinned directly on standard pins and yet should be preserved dry may be pinned as double mounts. This term refers to the insect's being mounted on a minuten or card point, which in turn is mounted or attached to a standard insect pin (fig. 21). Minutens are available from supply houses in 10 and 15- mm lengths and in two or three thicknesses. They are finely pointed at one end, headless on the other, and generally of stainless steel. Double mounts are assembled by inserting the minuten into a small cube of soft, pithy material such as fine cork, balsa wood, fine-textured plastic, or polyporus, which is a pure white material obtained from a bracket fungus. Polyporus traditionally has been a favorite material, but it is expensive and difficult to obtain, especially in America. Many entomologists prefer silicone rubber, obtained from plastics suppliers and made into plaques by pouring the polymerized material, a thick creamy liquid, into a flat- bottomed plastic container to a depth of about 2.5 mm and allowing it to solidify for several hours. It may then be lifted easily from the mold and cut with a sharp knife or razor blade into square strips and finally into cubes. With most materials, the minuten must be inserted point first, but with silicone rubber it may be inserted dull end first until it strikes the surface on which the cube is Iying, and it will be held firmly. Minutens should be handled with forceps; they are so small that even the unsharpened end can easily pierce a finger.
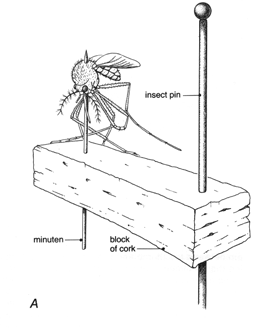 Figure 21A. Mosquito pinned with minuten to block of cork on pin.
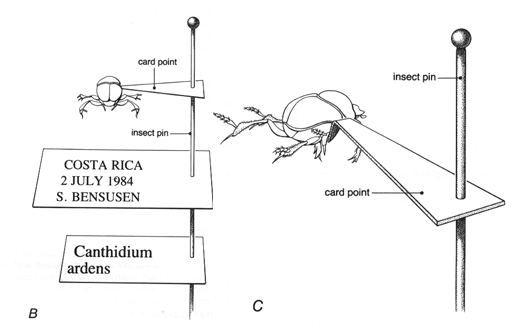
Figure 21B-C. B) Correct positioning of point and labels on pin. C) Attachment of card point to right side of specimen.
It is possible, and sometimes preferable, to mount an insect on a minuten before inserting the minuten into the mounting cube; however, it is most convenient to prepare a series of minuten mounts beforehand, already attached to standard No. 3 pins. To mount extremely small insects, such as tiny parasitic wasps, on minutens, pick up a droplet of cement with the prepared minuten and simply place the tip of the minuten with the cement on it between the base of the insect legs or on the right side of the thorax. In mounting an insect on a minuten, the pin need extend no more than barely through the insect. If the insect is lying on a glass surface when it is pierced with the minuten, a little extra pressure will curl the point of the minuten back into the insect and insure that the specimen will not come off the minuten.
For double mounting microlepidoptera, specimens are most easily mounted using a minuten, rather than a pin, and pinning and spreading the insects much as one would larger moths or butterflies. However, instead of using spreading boards (described later), a dense, smooth polyethelene foam is used as the spread surface. A narrow v-shaped groove cut into the foam provides a shallow indentation into which the body of the specimen can be placed so that the wings are level with the surface of the foam. Smooth polyethelene foam has a number of advantages for microlepidoptera. The surface acquires a small static charge which helps wings cling slightly to the surface and facilitates spreading; it grips the minutens firmly and leaves no holes; it sustains little wear over time. The foam is usually glued into clear, polystyrene plastic boxes. After the spread insects have dried, they are double mounted onto a polyporous block on a normal insect pin. Microlepidoptera should never be glues to points.
Many entomologists prefer to mount insects on a minuten in a vertical position in a short strip of polyporus or silicone, with the minuten therefore parallel to the main pin. The insect lies sidewise in the finished mount, in an excellent position for examination under a microscope, and is less liable to damage in handling than it would be otherwise.
Reference: Peterson et al. 1961; Landry and Landry 1994.
Card points are slender little triangles of stiff paper. They are pinned through the broad end with a No. 2 or 3 insect pin, and the insect is then glued to the point (fig. 21b). Card points may be cut with scissors from a strip of paper; they should be no more than 12 mm long and 3 mm wide. However, a special punch for card points, obtainable from entomological supply houses, will make better, more uniform points. Card points should be made only from good quality paper, as good as or better than that used for data labels (see p. 43). If specimens are in good condition and are well prepared, they may reasonably be kept in museum collections for a long time, perhaps even for centuries. Much of the paper in common use does not have that kind of life expectancy; it becomes yellow and brittle with age. Paper made especially to last, such as that used for herbarium sheets in botanical collections, is highly recommended
 Figure 22. A card-mounted chalcid wasp
A similar double mount method that is popular in Europe for mounting small specimens is the card mount (fig. 22). These small rectuangular cards can be purchased commercially or special punches can be bought to make them yourself. In this method the specimen is mounted laterally at about a 45 degree angle. If done properly, this technique allows viewing of all structures on the insect and the surrounding card provides greater protection for small and fragile specimens. However, caution must be used to ensure that the specimens's mouthparts, wings, etc. do not become embedded in the mounting media and that other characters are not obscured by mounting the specimen flat on the dorsum or venter. With some practice, this method provides very good results. A derivative of this method which also has the advantage of providing extra protection to the specimen is to use a standard point mount and then attach a card mount below, but close to, the pointed specimen.
The choice of the best adhesive for card points may be equally important, but unfortunately the aging properties of various glues are not known. Ordinary white (casein) glue, clear acetate cement, or fingernail polish is used commonly.
Another medium in use for many years is viscous polyvinyl acetate. It is obtainable in granular, bead, or pellet form. A small quantity is placed in a bottle with a glass rod in its stopper and covered with absolute ethanol. It will dissolve in a day or two into a thick solution. If it is too thick, it will "string out," and more ethanol should be added. If it is too thin, the bottle should be left open to allow some of the ethanol to evaporate. After a period of use, the solution will also normally become too thick, and then more ethanol must be added. Specimens adhere very well to a pin or a point with this solution, and they may be removed with 95 percent ethanol.
Many entomologists use shellac gel (see Martin 1977) which is now available commercially. It has the benefit of remaining tacky for some time and not forming a "skin" like some water based media. This allows additional time to get the insect positioned correctly. It is alcohol soluble.
Whatever adhesive is used, it should not be permitted to get so thick that it "strings." Should this happen, add a little solvent to the adhesive until it attains the proper consistency. Nor should it be so thin that it flows over a specimen. Only a small amount of adhesive should be used to glue the specimen to the card point, since excessive glue may obscure certain sutures or sclerites necessary for identification, just as the card point may conceal certain ventral structures if allowed to extend beyond the midline of the insect.
For most insects, the card point is attached to the right side of the specimen (fig. 21b), with the left side and midventral area clear. For better adhesion with some insects, the tip of the card point may be bent downward at a slight angle to fit against the side of the specimen. Only a very small part of the point should be bent. With a little practice it will be easy to judge how much of the point to bend and at what angle to fit the particular insect being mounted. As an alternative to bending the tip, it can simply be snipped off with scissors to form a truncated end that fits each specimen, i.e., matching the size fo the metasternum in small beetles.
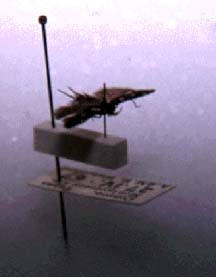 Figure 23. A double-mounted moth
One method to insure that the specimen is oriented properly on the point is to place it on its back with its head toward you; then with the pin held upside down, touch a bit of adhesive to the bent point and apply it to the right side of the insect. If the top of the point can be slipped between the body of the insect and an adjacent leg, a stronger mount will result. The card point should be attached to the side of the thorax, not to the wing, abdomen, or head. Some insects, such as small flies and wasps, are mounted on unbent points. Those working with small flies prefer to attach the card point to the left side of the specimen with the legs facing the pin.
Opinions differ on when to use direct pinning and when to use a double mount, and perhaps this is best determined through experience. A general rule of thumb is that if you can mount a small insect on a size 1 or 0 pin without damaging the specimen, do not use a double mount. Insects too heavy to be held on the point by adhesive yet too small to be pinned with standard pins may be attached to card points by puncturing the right side of the insect at the place where the card point normally would be placed and inserting into this puncture the tip of an unbent card point with a little glue on it. For puncturing specimens, use a needle ground and polished to make a small, sharp scalpel. Some specimens, such as moths, should never be glued to points; other specimens should never be pinned with minutens. The following suggestions will serve as a guide:
(1) Small moths, caddisflies, and neuropteroids- Mount on minuten inserted through center of thorax with abdomen positioned toward insect pin (fig. 23). Mount must be sufficiently low so that head of pin can be grasped easily with fingers or pinning forceps. Do not glue small moths to points. Ideally, such specimens should be spread in the conventional manner despite their small size.
(2) Mosquitoes and small flies (freshly killed)-Pin with minuten through the thorax with left side of specimen positioned toward main pin. Note that minuten is vertical, which is more advantageous than if it were horizontal because specimen is less liable to come into contact with fingers or pinning forceps. Placing a small amount of glue on tip of minuten before piercing specimen will help hold soft-bodied insects.
(3) Small wasps and flies (not freshly killed)-Mount on unbent card point with point inserted between coxae on right side of insect, keeping clear of midline, or glue tip of point to mesopleuron or laterally on a card (fig. 22).
(4) Small beetles, bugs, leafhoppers, and most other small insects-Glue card point with tip truncated or bent down to right side of specimen.
As to the length of pin exposed above the specimen, double mounts should conform to the same rule as in direct pinning: Do not place a double mount too high on the pin. It must be possible to grasp the head of the pin between the thumb and index finger without touching the specimen. Uniform height may be obtained by using a simple measuring device such as a three-step block prior to mounting the specimen (fig. 18). Double-mount cubes or points may be adjusted at any time, whereas once a directly pinned insect has dried on a pin, it is virtually impossible to move it without damage. If points become loose on the main pin, place a little adhesive at the connection.
Reference: Borgmeier 1964.
3.5 - Spreading Boards and Blocks
All insects preserved with the wings spread uniformly are set and dried in this position on spreading boards or blocks (fig. 24); spreading boards are more commonly used than spreading blocks. Although such pinning aids vary greatly in design, the same basic principle is inherent in all, that is, a smooth surface on which the wings are spread and positioned horizontally; a central, longitudinal groove for the body of the insect; and a layer of soft material into which the pin bearing the insect is inserted to hold the specimen at the proper height. An active collector will need from several to many spreading boards because the insects must dry for a considerable time (about 2 weeks for large specimens, one week for small ones) before being removed from the boards. Spreading boards may be purchased from biological supply houses or may easily be made as described here if the proper materials can be obtained. When purchasing spreading boards, avoid (1) too hard or too soft a material for the pinning medium under the central groove, (2) too hard an upper pinning surface, and (3) top pieces without the same thickness at the center (an especially common fault in beveled boards). This last defect may be corrected by sanding down the higher side; evenness is especially critical when working with small specimens.
 Figure 24. A typical spreading board for Lepidoptera
3.5.1 - Construction of Spreading Boards.
A spreading board of simple design (fig. 25) requires the following materials:
(A) Two top pieces, 9 mm by 4.8 cm by 38 cm, preferably of seasoned basswood, a fine-grained, durable wood from trees of the genus Tilia. Holes made in it by insect pins tend to close after they are removed. If the surface of the board is lightly sanded after use, especially when working with small specimens, its smooth, even quality can be maintained through many years of use. Basswood is sometimes known as 'whitewood'; however, wood from trees of the genus Liriodendron is also sold under this name. If basswood cannot be obtained, well-seasoned white pine selected for softness and 'pinability' is serviceable. A third choice is 20- cm (8-inch) beveled redwood siding. Beveled top pieces are desirable because the beveling, sloping inward, compensates for the tendency of the wings of spread specimens to droop slightly after the specimens are removed from the board. The 20-cm siding is actually 19.1 cm wide, and a 0.9- meter piece of it will provide two pairs of top pieces. One pair cut slightly more than 4.8 cm wide from the wide side of the board and planed to exact width will make a pair 11 mm thick at the narrow side, and another pair cut from the same side of the board will provide a second pair about 8 mm thick at the narrow side. Redwood is stiff and fine grained, but it splits and splinters easily.
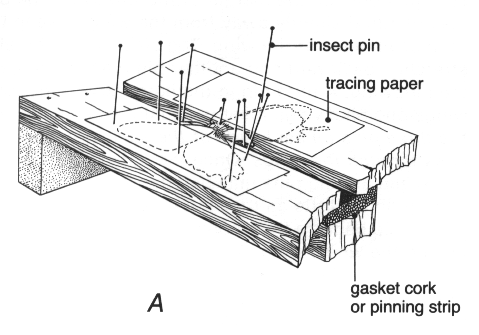
Figure 25. Cross-section of a typical spreading board
(B) Two end pieces of any good, fine-grained wood, 2 cm square by 10 cm.
(C) One strip of entomological or gasket cork or foam, 6 mm by 3 cm by 34 cm.
(D) One base of plywood or any fine-grained wood, 6 mm by 1 0 cm by 38 cm.
These materials are for a spreading board with a central groove 6 mm wide. Boards with grooves of several sizes will be needed. For the larger Lepidoptera (macrolepidoptera or 'macros'), the most useful widths are 3, 6, and 9 mm. For very large moths, a width of 17 mm is required; the board will also have to be as much as 15 cm in total width with a groove depth of 16 mm. For small moths (microlepidoptera or'microsi), special boards with groove widths of 1.5-2 mm will be needed, with the groove shallow enough for minutens, and the width and thickness of the top pieces (A) must be altered accordingly. The pinning medium (C) could be of polyethylene foam, but to give specimens firm support, the entire depth between the top pieces and the base would have to be filled with the material. A dense, finely textured plastic foam known as 'Plastazote' is better than polyethylene for entomological applications and is available in Britain but so far not in the United States. A strip of modelmaker's balsa wood, selected for pinning softness, may also be satisfactory.
The end pieces (B) should be glued with epoxy or other good adhesive and nailed to the top pieces (A) with the proper groove width maintained. Then the pinning strip (C) should be firmly glued to the underside of the top pieces (A), the same side on which the end pieces (B) were fastened, and should cover the central groove. Finally, after the adhesive has set, the base (D) should be attached. If it is affixed to the end pieces (B) with two flat-headed wood screws (about No. 5,19 mm) countersunk into the base piece and screwed into each end piece, the base may be removed easily later if replacement of the pinning strip is necessary.
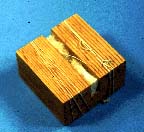 Figure 26. A small spreading block
3.5.2 - Using the Spreading Boards
Before spreading specimens, the spreading boards and the following materials should be at hand:
(1) Pins (called setting pins) of size 00 or 000 for bringing wings into position. Setting pins used by some lepidopterists are made by inserting a minuten into a round matchstick and securing it with a drop of glue.
(2) Strips of glassine or tracing paper (the translucent, smooth paper used for tracing, not what a draftsman calls tracing paper). Cellophane, plastic film, or waxed paper should not be used. Their disadvantages include expanding with moisture and becoming electrostatically charged or containing a substance that pulls scales off the wings. The strips of tracing paper should be wide enough to extend from the base to a little beyond the end of the wings of the specimens being spread. Strips about 25 mm wide are convenient for spreading most Lepidoptera. Short ones are used when spreading specimens that have been relaxed from a dried condition, but strips long enough to cover several specimens in a row on the board are commonly used for freshly caught insects. The strips are often used with a narrow fold alongside the body of the specimen with the fold upward; this provides a rounded edge that reduces the likelihood of a sharp edge displacing a row of scales. This fold may be made by holding the strip on a spreading board with 3-5 mm of it overhanging the edge of board, running a finger along the overhang to bend it down, and then firmly folding it back.
(3) Glass-headed pins at least 2.5 cm long for holding the strips in place. Ordinary No. 2 or 3 insect pins with nylon heads may also be used, but some lepidopterists find them hard on the fingers.
With this equipment ready, the collector is prepared to mount and spread the specimens (fig. 20, B). The specimens must be properly relaxed (see p. 24), even the freshly collected ones, before any attempt is made to spread the wings. Insert an insect pin of appropriate size through the middle of the thorax, leaving at least 7 mm of pin above the specimen. The pin should pass through the body as nearly vertically as possible to avoid having the wings higher on one side than on the other. Pin the specimen into the central groove of the spreading board so that the wings are exactly level with the surface of the board. Carefully draw each wing forward with the point of a setting pin inserted near the base and immediately behind the strong veins that lie near the front of the wings. If care is taken not to tear the wing, the fine setting pins should leave holes so small that they are barely visible. The hindmargin of the forewings should be at right angles to the groove in the board. Bring the hindwing into a natural position with its base slightly under the forewing. The setting pins will hold the wings in position until they can be secured with the paper strips.
The strip is placed close to the body of the insect, with its fold upward and toward the insect. A glass-headed pin is inserted in the middle of the folded part of the strip just outside the margin of the forewing. The pin may be tilted slightly away from the wing to keep the strip down against the wing. The strip is then carefully stretched backward and another pin placed just behind the hindwing. A third pin in the notch where the forewings and hindwings meet is usually enough. None of the three pins on each side of the specimen should pass through the wings. Once the paper strips are in place, the setting pins may be removed. Twisting the setting pins a little as they are removed will prevent a possible bent tip from hooking onto a wing vein and pulling the whole wing out of place.
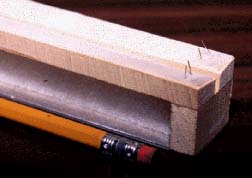 Figure 27. A small spreading board of the type used for microlepidoptera
Fresh specimens may be arranged closely on the board in series of five, six, or even more before the paper strips are applied to cover all. Relaxed specimens, however, should be treated individually because they dry so quickly that antennae may break or the wings curl if the spreading is not completed promptly.
To prevent the abdomen from drooping as the specimen dries, support it with a pin on each side, crossing beneath. Pins may also be used to arrange and hold the antennae and legs in position until they dry. The appearance of many insects may be improved by gently blowing on them before spreading to remove extraneous loose scales and to straighten the hairs or, with small moths, the fringes of the wings. In working with small insects, a large magnifying lens mounted on an adjustable stand may be very helpful.
Specimens relaxed from a dried condition present some additional problems. The wings may be stiff and require loosening (see p. 25). If the wings of a relaxed specimen are turned upward and do not lie on the surface of the spreading board, the paper strips may need to be pinned over tne wings to hold them down before they are positioned. Since the wings of relaxed specimens are still relatively stiff, skillful manipulation is needed to spread the wings without tearing or leaving excessively large pinholes. If the wings do not move readily under gentle pressure, do not force and possibly break them. Return the specimen to the relaxing chamber.
3.5.3 - Construction of Spreading Blocks.
The spreading block is a modification of the spreading board designed to accommodate only one specimen at a time. In the past, blocks were often preferred by specialists in microlepidoptera. More recently, most specialists have taken tosing smaller spreading boards such as that in fig. 27. However, spreading blocks can used for other insects as well. The design is simple (fig. 26), consisting of a wooden cube about 3 cm on a side for most insects, with a groove across the middle of one face. The width and depth of the groove vary to suit the size of the insect to be spread, usually 1.5-2 mm in width and deep enough to accommodate a strip of fine cork, polyporus, or similar pithy material into which the pin or minuten is lodged to hold the insects being spread. The groove should be cut parallel with the grain of the wood, and the top surface of the block should be sanded exceedingly smooth. Before the pinning strip is wedged or cemented into the bottom of the groove, a hole about 1 mm in diameter should be drilled squarely in its middle. The pin can extend into this hole when the insect becomes level with the spreading surface. A few gashes, made by pressing the blade of a thin knife in the upper corners of the block near each end of the groove, should be made to catch the thread that will hold the wings of the insect.
The insect to be spread, mounted either on a standard insect pin or on a minuten, is pinned into the groove as with a spreading board, and the wings are manipulated by gentle blowing and using a setting pin. A piece of fine silk or nylon thread is then caught in one of the knife gashes and brought over the wings, and, if necessary, once around the block and again over the wing at another point, and finally caught again in the knife gash. A small piece of tracing paper may be placed on the wings before passing the thread over them, but if special scale tufts are found on the wings it is better to omit the paper and leave the tufts in a natural position.
Specimens either on spreading boards or blocks should be placed in a warm, well-ventilated place to dry for at about 2 weeks less for very small moths. If they are placed in a low- temperature oven, such as is used for drying plant specimens, 2 days may suffice. Specimens relaxed from a dry condition, as already noted, dry quickest, but even they should be left for several days. Fresh specimens, even large ones, may be dried in 2 days or less with heat. Where humidity is low and there is ample sunshine, the spreading boards or blocks may be placed in cardboard cartons painted black and left out in full sunlight for about 2 days. Occasionally, specimens may become greasy, but otherwise no harm results. The spreading boards or blocks must be kept where they are safe from mice, bats, dermestid beetles, lizards, psocids (booklice and barklice), and ants, especially in the Tropics. One preventative measure that is sometimes advisable is to place the boards or blocks on bricks set in pans of water. If they are hung from the ceiling, a mosquito net around them may be necessary.
Always keep temporary data labels with specimens on spreading boards or associated with them in some way to insure that there is no confusion or loss of data when they are removed from the boards.
Spreading is a highly individualistic skill, subject to wide variation. Nearly everyone, with practice, evolves his or her own technique, so that two workers may appear to follow different procedures and yet produce equally good results. There is no single standardized technique with respect to the fine points of spreading.
References: Lewis 1965; Tagestad 1974, 1977.
3.6 - Riker Mounts
It is sometimes desirable to prepare specimens for exhibition in such a way that they may be handled freely for close examination without risk of damage. Riker mounts have long been used for this purpose. They may be purchased from entomological supply houses, but similar cases may easily be constructed. The Riker mount (fig. 28) is simply a flat cardboard box about 3 cm deep, filled with cotton, and having a pane of glass or plastic set into the cover. Unpinned specimens are placed upsidedown on the glass of the cover, spread into position with some cotton held in place by small weights, and allowed to dry thoroughly (about 2 weeks). Then the weights are removed, enough cotton is added to hold the specimens firmly in place, a little fumigant is added to kill any pests or their eggs that might have been laid in the box, and the bottom part of the box is put in place. When the box is closed, it should be sealed completely to prevent access to pests. Plant material may also be dried in place with the specimens.
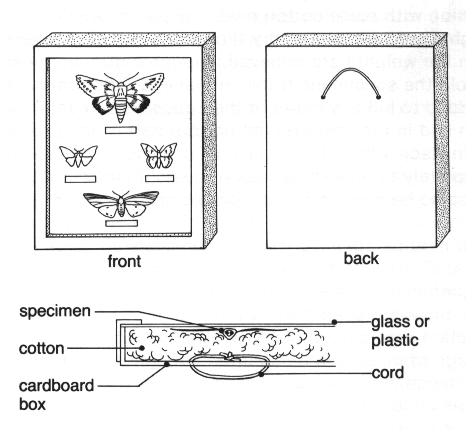 Figure 28. A Riker mount
Riker mounts are practical only for relatively large insects, such as butterflies, larger moths, beetles, and dragonflies, that are suitable for such display. Although Riker-mounted specimens are useful for classroom instruction and general display, they are not used for storage of insects in a scientific collection, where specimens must be available for examination from all angles under magnification. Riker mounts should be inspected periodically for pests and kept out of sunlight, which will cause fading of colors and general deterioration.
It is sometimes desirable to put pinned specimens into Riker mounts. To do so, remove the pin or cut it off flush with the surface of the insect (see Holbrook 1927).
3.7 - Inflation of Larvae
A common practice in the 19th and early 20th centuries was to preserve larvae, mainly caterpillars, by inflation. That practice has largely been abandoned in favor of alcoholic preservation or freeze-drying. These latter methods permit more thorough examination of all parts of the specimens, even internal organs, which must be removed before inflation. Some of the colors of larger larvae are better preserved in inflated specimens than in alcohol, but color photography has made preservation of the larval colors less essential. However, the technique is still potentially useful and, if well done, is not to be discouraged. For instructions on how to inflate larvae, the following references may be consulted.
References: Banks 1909 (pp.69-70); Hammond 1960; Martin 1977.
3.8 - Artificial Drying
The most widely used method of artificial drying now in use at most museums and other institutions is critical point drying (fig. 29). In critical point drying (CPD), specimens are immersed in absolute ethanol and a special machine is used to exchange the alcohol with liquid carbon dioxide under pressure. The liquid CO2 is then warmed and passes through the "critical point" and is bled off. The effect of this process is to remove all water from soft tissues and in effect "freeze" them in position. In this way, soft bodied specimens can be dried without the distortion that normally results when soft tissues are air dryed. CPD machines are still fairly expensive and generally beyond the range of individuals although they are very common at larger institutions.
A more "low-tech" method of drying soft-bodied insects and other arthropods in a very lifelike manner and with no loss of color is by freeze-drying. While the cost of specialized freeze-drying equipment is high, it is possible to freeze dry specimens in an ordinary freezer if done carefully.
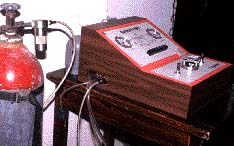 Figure 29. A critical point dryer and its accompanying CO2 supply
Briefly, the procedure consists of killing the insect by first freezing it in a natural position and then dehydrating it under vacuum in a desiccator jar kept inside a freezer at -4° to -7° C. With a vacuum of 0.1 micrometer at -7°, a medium sized caterpillar will lose about 90 percent of its moisture and about 75 percent of its weight in 48 hours. Its frozen condition prevents distortion while drying. The time required to complete drying is variable, at least a few days with small specimens and more than a week with larger ones. When dry, they can be brought up to room temperature and pressure, and permanently stored in a collection. Like all well-dried insect specimens, they are rather brittle and must be handled carefully. Freeze-drying yields excellent specimens of plant galls formed by insects.
An inexpensive method of freeze-drying (Fisher & Jursic 1958) requires about 100 days to dry a medium-sized larva. The use of acetone is recommended before drying pinned specimens for better preservation of their colors, one of the features sought in artificial drying (Berte 1979).
Another method of drying involves the use of hexamethyldisilazane (HMDS) (Brown 1993; Nation 1983; van Noort 1995). Using this method specimens are soaked in absolute alcohol until all water has been removed. They are then moved into a small amount of HMDS for a few minutes, then into a second bath of HMDS (larger specimens may require a third transfer), which replaces the alcohol in the specimen with HMDS. Finally, the HMDS is allowed to evaporate. This method has proven quite effective in preventing distortion of specimens, but HMDS can be toxic and must be used with adequate ventilation, preferably within a fume hood. A variation of this method uses acetone in place of HMDS.
References: Berte 1979; Dodge & Seago 1954; Fisher & Jursic 1958; Gordh & Hall 1979; Harris 1964; Hower 1979; Woodring & Blum 1963.
3.9 - Embedding
Preservation of various kinds of biological specimens in polymerized transparent plastics was popular in the 1940's and 1950's and is still of some interest. The process is rather complicated and laborious, but if carefully done it will yield useful preparations, especially for exhibits and teaching. Directions for embedding insect specimens may be found in the references belowand in directions furnished by suppliers of the materials.
References: Fallis & Smith 1964; Fleming et al. 1940; Hocking 1953.
3.10 - Mounting Specimens for Microscopic Examination
The small size of mites, thrips, whiteflies, aphids, scale insects, fleas, parasitic wasps, and many other insects, as well as the necessity of clearly seeing minute details of larger insects, requires examination under a compound microscope at high magnification. Such specimens and parts of specimens must therefore be specially prepared and placed temporarily or permanently on microscope slides. If large and thick or complex structures that must be examined from several angles make slide mounting inadvisable, they may be examined in a liquid and preserved in microvials. Whichever course is adopted, their preliminary treatment is the same.
The techniques and materials (fig. 30) used in preparing specimens for high-power microscopic examination vary considerably according to the kind of insect or mite as well as the researcher's preferences. The information given here will provide the reader with a basic concept of the principles involved in preparing specimens for such study. For more specific instructions, consult the references cited below. For reagents and media formulas mentioned here, see the Appendix.
 Figure 30. Typical materials used in slide making
References (general): Baker 1958; Burrells 1978; Fredeen 1961; Gruber & Prieto 1976; Guyer 1953; Hood 1947; McClung 1964; Mitchell & Cook 1952; Noyes 1982; Richards 1964; Singer 1967; Willey 1971; Wirth & Martston 1968.
Although information on slide preparation is broad and varies considerably according to the condition of the specimen and the mounting medium used, certain features are common to all processes. Cleaning, clearing, and maceration are nearly always necessary preliminaries. It is often desirable to dissect and critically examine specimens after the preliminary treatment and before mounting.
Clearing is the process of making the tissues of the specimen more transparent. It is often advisable to remove internal organs and muscles by using chemicals and to extend, manipulate, or dissect the specimens. This chemical removal of muscles and other soft tissues is known as maceration, although it is sometimes incorrectly called clearing. The agents used to macerate specimens usually also clean and clear them. Many mounting mediums also act as clearing agents to some extent.
Reference: Hazeltine 1962.
Dehydration is usually a necessary preliminary to mounting, especially if the medium has a resin base. With some kinds of specimens, it is advisable to do this gradually or in steps to avoid distorting the specimens.
Staining is sometimes necessary with insect and mite specimens because their immersion in the mounting medium may make colorless and transparent tissues virtually invisible if the medium has a refractive index close to that of the tissues of the specimen (see Stein et al. 1968). Bleaching, usually accomplished with hydrogen peroxide, may also be required in very dark-colored specimens.
Figure 31. Slide-mounted specimens. The bottom specimen is mounted in Hoyer's medium and has been ringed to prevent dessication.
Washing is usually necessary at one or more stages in the process to remove and prevent excessive action by certain reagents used.
The final stage in preparing permanent mounts is thorough drying or hardening of the medium. This may be done in any clean environment or in an oven or special slide warmer under gentle heat. The mounts should be carefully labeled either before drying or afterward. If more than one mount is being made at a time, some recognition mark or code must be used on reagent containers and anything associated with the specimen so that the final mount may be correctly labeled.
The following procedures are given for mounting specimens to be examined microscopically:
(1) Maceration. Since only the sclerotic or chitinized parts of the insects are ordinarily needed in a preparation, the aim of maceration is to eliminate external secretions, foreign matter, some organs, muscles, and fat bodies without damage to chitinous parts. This is accomplished by immersing the specimen in a suitable agent, such as a sodium hydroxide (NaOH) solution, lactic acid, or lactophenol. These chemicals are strongly caustic and must be handled carefully to avoid damage to the skin and eyes. If any is inadvertently spattered on the skin, immediately wash it off with water.
Although textbooks specify potassium hydroxide (KOH) for maceration, this chemical must be used cautiously because specimens may be easily and quickly damaged or completely ruined in it. NaOH will perform as well as KOH or even better. Fine ducts lost with KOH remain even after lengthy treatment with NaOH, which will damage only teneral or newly emerged specimens. The amount of time a specimen is left in the macerating agent depends on the degree of sclerotization and the age and pigmentation of the specimen. For some relatively large, whole insects, the cuticle must be punctured with a fine needle to allow the agent to penetrate the body. Heating accelerates the action, but care must be taken to avoid damage by excessive action, especially if the specimen is at all teneral. Immersion of the genitalia in cold 10~20 percent KOH solution overnight is the recommended method for microlepidoptera. Boiling for a minute in a 10 percent solution of NaOH (ordinary household lye) will clear most other small genitalia. NaOH supplied by chemical firms in pellet form is most convenient; three pellets in about 10 ml of water may be used for a day. The solution, however, is useless if left overnight. Even if it boils dry on a hotplate set a little above its boiling point, a specimen in it will seldom be damaged by NaOH, although it will be completely dissolved in KOH. Adding water to a specimen boiled dry in NaOH solution will usually restore it.
For directions on how to macerate insect genitalia, see p. 37.
(2) Washing. For the removal of the caustic agent used to macerate the specimen, ordinary tapwater in a small dish, such as a small plastic bottle cover, will suffice. Distilled water is unnecessary. If the specimen is placed for at least a few minutes in plain water for manipulation, dissection, or examination, it then will be ready for further treatment. Adding a drop of acetic acid (white vinegar) will guarantee that no caustic remains.
(3a) Staining. After clearing and washing, specimens may be stained if necessary, although if a phase-contrast microscope is available, staining, even with colorless specimens, is unnecessary. Several kinds of stains are available from biological supply houses. Acid fuchsin is generally used for aphids, lice, and scale insects. Chlorozol black or mercurochrome generally are used for microlepidoptera, although the latter may fade over time. Thrips and fleas should never be stained; most acarologists do not stain mites if they are to be mounted in Hoyer's medium. An easily obtained stain for the exoskeleton of insects is made by dissolving a small amount of Mercurochrome crystals in water. Specimens may be immersed in the stain solution for 1 minute or more, depending on the degree of staining needed, and then briefly rinsed in plain water.
References: Carayon 1969; Gier 1949.
(3b) Bleaching. If specimens are too dark to reveal sufficient detail after maceration, they may be bleached in a mixture of one part strong ammonia solution to six parts hydrogen peroxide solution. The length of time the specimen is left in the ammonia-peroxide solution depends on the amount of bleaching needed.
(3c) Dehyrdation. Specimens should be dehyrated (have the water removed) in alcohol or cellosolve. The length of time depends on the specimens, but 10-20 minutes is usually sufficient.
(4) Mounting. At this point, further treatment depends on what use is to be made of the preparation. It may be needed only temporarily in routine work and may be discarded after examination, or it may be desirable to keep the preparation permanently, either in glycerin in a microvial or in a mounting medium on a slide. If it is to be kept in a microvial, see Preparation and Storage of Genitalia (p. 37); if it is to be mounted on a slide, further treatment depends on the mounting medium used.
(4a) Temporary Mounting. A temporary mount can be made with lactic acid or other medium on a 2.5- by 7.5-cm cavity slide. The specimen is placed near the edge of the cavity and wedged into position by manipulating a cover glass over the cavity and the specimen. A fine needle will help bring the specimen into the desired position before the cover glass is centered over the cavity. Once the specimen is in position and the cover glass centered, a commercial ringing compound, nail polish, or quick-drying cement is used to seal around the edge of the cover glass. Such slides may be kept for a year or more, but because they take up more space in a collection than permanent slides, the specimens eventually are usually placed in vials of alcohol for storage.
Temporary mounts are advantageous in that the specimen can be turned easily and viewed from many angles. However, because of the thickness of the mounts, a vertical illuminator operated through a microscope or some alternate method of direct lighting is generally needed.
Genitalia and other insect or mite parts may be examined and drawings made with the aid of an ocular grid in the microscope while they are lying in water in the dish in which they were dissected and extended. Water gives contrast to the structure, which may be difficult to see in glycerin. The water should be "dead," that is, boiled to drive out gases that may form bubbles in or on the object. The object may be held in place with a minuten bent L-wise and laid over the object or by piercing it at a convenient place.
(4b) Mounting Media. The standard medium for permanent mounts is Canada balsam. Before mounting, the specimen must first be dehydrated through a series of alcohols of increasing concentration or in cellosolve. Balsam may yellow somewhat with age and this can make observation of characters and photography difficult; it can also be difficult to manipulate delicate specimens in it if it is not thinned properly. The mounting medium should be selected after consulting with a specialist or by referring to textbooks. Mites, for example, require special treatment, mainly because their cuticle differs from that of insects.
Another satisfactory mounting medium for most insects (other than scales and thrips) is Euparal, a synthetic preparation used for many decades. When it was unobtainable, especially during the World Wars, an inferior compound was used. Euparal may be obtained from medical or entomological supply houses and other sources, all of which import it from Germany. Its formula is a proprietary secret. It is not necessary to dehydrate specimens before mounting them in it. Good preparations may be made from specimens taken directly from 80 percent ethanol and from specimens immersed in 95 percent ethanol for only a minute.
The medium is water-white, remains so indefinitely, and for remounting, in case of breakage, specimens may be removed by soaking in absolute ethanol. Euparal has a very decided advantage over other media in that small air bubbles trapped in slide preparations are absorbed by the medium during drying, although this sometimes requires several days. Its only disadvantage is that it shrinks considerably in drying. In moderately thick preparations, this results in shrinkage away from the edges of the cover slip. This may be countered by adding additional Euparal until there is no further shrinkage, or in many instances by using a large cover slip, 2.2 cm in diameter, which in drying will pull down around the edges instead of allowing the medium to draw inward. The medium is relatively fast-drying. Allowing the slide to remain overnight in an oven set at about 35° C or in the open at room temperature for a few days will yield usable and permanent preparations.
Hoyer's medium and polyvinyl alcohol (PVA) are aqueous mounting media. Slides made with them are considered only semipermanent, although in the U.S. National Collection of Insects at the Smithsonian Institution, some 40-year-old slides of mites mounted in Hoyer's medium are still in good condition. Nevertheless, many other slides show significant deterioration after only a few years, even when ringed. Slide preparations made with Hoyer's or PVA, particularly of large or thick specimens, tend to crystallize with age and may need remounting. Some specimens may be destroyed completely.
To remount specimens, soak the slide in water until the cover glass can be removed, then lift the specimen carefully and transfer it to a new slide. Some technicians find slides easier to prepare if the Hoyer's medium is diluted with water; however, in the process the mounts may collapse as the excess water evaporates. It is strongly recommended that Hoyer's medium be prepared exactly as directed (see Appendix) and used undiluted. However, it should be noted that one of the primary ingredients (chloral hydrate) of Hoyer's is now listed as a controlled substance by the government so that it is impossible to buy without a permit.
Aqueous media are affected by ambient moisture; mounts made in very humid conditions may not dry satisfactorily. Nevertheless, Hoyer's is preferred by most acarologists because its refractive index is excellent for use with mites, and specimens can be mounted directly from the collecting fluid without clearing or fixing. The specimens are cleared after mounting by heating the slides briefly on a hotplate set at 65° C until the medium barely begins to bubble. Do not allow Hoyer's medium to boil or the specimens may be ruined. Such mounts can be prepared quickly for immediate study but should be placed in an oven for curing (See item (7).
(5) To place specimens in the medium, put one or more drops of the medium in the center of a 2.5- by 7.5-cm clean glass slide. The precise amount of medium to use will require some experience. Enough is needed to run under the entire cover glass. When Euparal is used, a little more is required than with some other media because of shrinkage, but an excess of any medium around the edge of the cover slip is undesirable.
Place the cleared and washed (also stained or bleached if necessary) specimen in the medium on the slide and make sure that it is well immersed and that air bubbles are absent. Arrange it in the desired position with a fine needle. If the specimen is thick, place at least three pieces of broken cover glass or plastic props around it to prevent undue crushing when the cover slip is applied. With some preparations, as for example with ovipositors of tephritid flies, a considerable amount of pressure during drying is desirable to obtain maximally flattened and comparable preparations. Then gently lower a cover slip onto the specimen with forceps, holding the cover slip at a slight angle so that it touches the medium first at one side to prevent air entrapment as much as possible. A small amount of thinning agent on the under surface of the cover slip may help avoud trapped air bubbles. Apply gentle pressure with the forceps to fix the position of the specimen.
It is often advisable to prepare specimens in more than one position, for example, dorsal side up as well as dorsal side down, but do not mount parts of more than one individual specimen on one slide, because all individuals in the series may not be taxonomically identical.
(6) Ringing. Special compounds are available to apply in a circle around the edge of the cover glass and the adjacent area of the slide to seal the medium (fig. 31). This is advisable with aqueous and other median that do not harden as they dry. It is not necessary to ring Canada balsam or Euparal mounts.
(7) Curing. Allow slides to dry or set completely before handling or placing them in other than a horizontal position. Until dry, avoid storing them in a slide box, mailing them, or allowing other persons to use them. If an oven or slide warmer is available, set it at about 45° C. The amount of time it takes to dry a slide is variable depending on the medium, size of the specimen, and other factors such as humidity. It may take from a couple days for small specimens in aqueous media up to several weeks for larger balsam mounts before a slide is dry enough to ship or store on edge. One way to check progess is by very lightly pressing on the center of the coverslip and watching to see if there is movement of the specimen in the medium.
(8) Labeling Slides. Collection data should accompany specimens at all times during preparation. Square gummed labels are obtainable from biological supply houses. Excellent ones are now available with pressure-sensitive cement that prevents the labels from peeling off, as often happens with standard gummed labels that require moisture for attachment . Some workers place all information on one label; others use two labels, one at each end of the slide (fig. 31), with the identification on one label and the collection data on the other. All data should be written clearly with permanent ink, typeset, or typed and reproduced photographically. The kind of mounting medium used should also be noted on a label if remounting is necessary.
|


